Simplifying VCD Load Balancing and Certificate Replacement
02 Dec 2020 by Simon Greaves
Overview
Replacing certificates in VCD is a fairly straight forward process and can be made significantly easier if you deviate from the procedure outlined in the official VMware documentation and instead use a simple load balancer and install the same certificate and key pairs on each node within the VCD cluster. Let me explain.
Background
As a service designed for external public consumption, VCD uses two internet facing IP addresses for providing the key VCD services:
- one is the http service
- the other is the console proxy service
As the names suggest, http (port 443) is for web traffic such logging into the web portal and the console proxy (port 8443) is for providing the console sessions to the underlying virtual machines for things such as OS installation. Historically these services required different IP addresses, however with the VCD appliances these two services run on the same network adapter, eth0, leaving eth1 for other network traffic types. By running on two different ports the same network adapter can provide both services.
Note It is possible to change the port for the console proxy to say 443 however this is beyond the scope of this guide.
Load Balancing
To make these two service http and console proxy available across multiple VCD instances in a group, or cells, a load balancer is required.
The VMware documentation has always recommended using L7 application load balancing with SSL offload on a load balancer for the http service and L4 SSL passthrough for the console proxy service. Whilst this can work well I think this is an unnecessarily complex design for most deployments and would strongly recommend configuring just a single L4 load balancer for the backend cells which can service both traffic types.
Server Certificates
Using the historic method of load balancing with SSL offload, you do gain the ability to configure load balancing rules such as creating an “administrative zone” for internal VCD requests to present an internal CA-signed certificate for internal users such as VCD admins and another “public zone” load-balancing rule for customer connections to present a public CA-signed certificate to users who do not have awareness of the internal admin zone domain. However this sort of configuration is complex.
A simpler way to achieve this two-zone configuration would be to install the public CA-signed certificate on every cell and configure internal DNS with an A record for the public internet address so that both public users and internal users send requests to the same public FQDN.
- The internal users would go directly to the load-balanced internal IP address
- The customer users would go via the public IP address, and then NAT on your public firewall translates that connection to the internal load-balanced IP address.
Both these approaches present the same public CA signed certificate. See the diagram below.
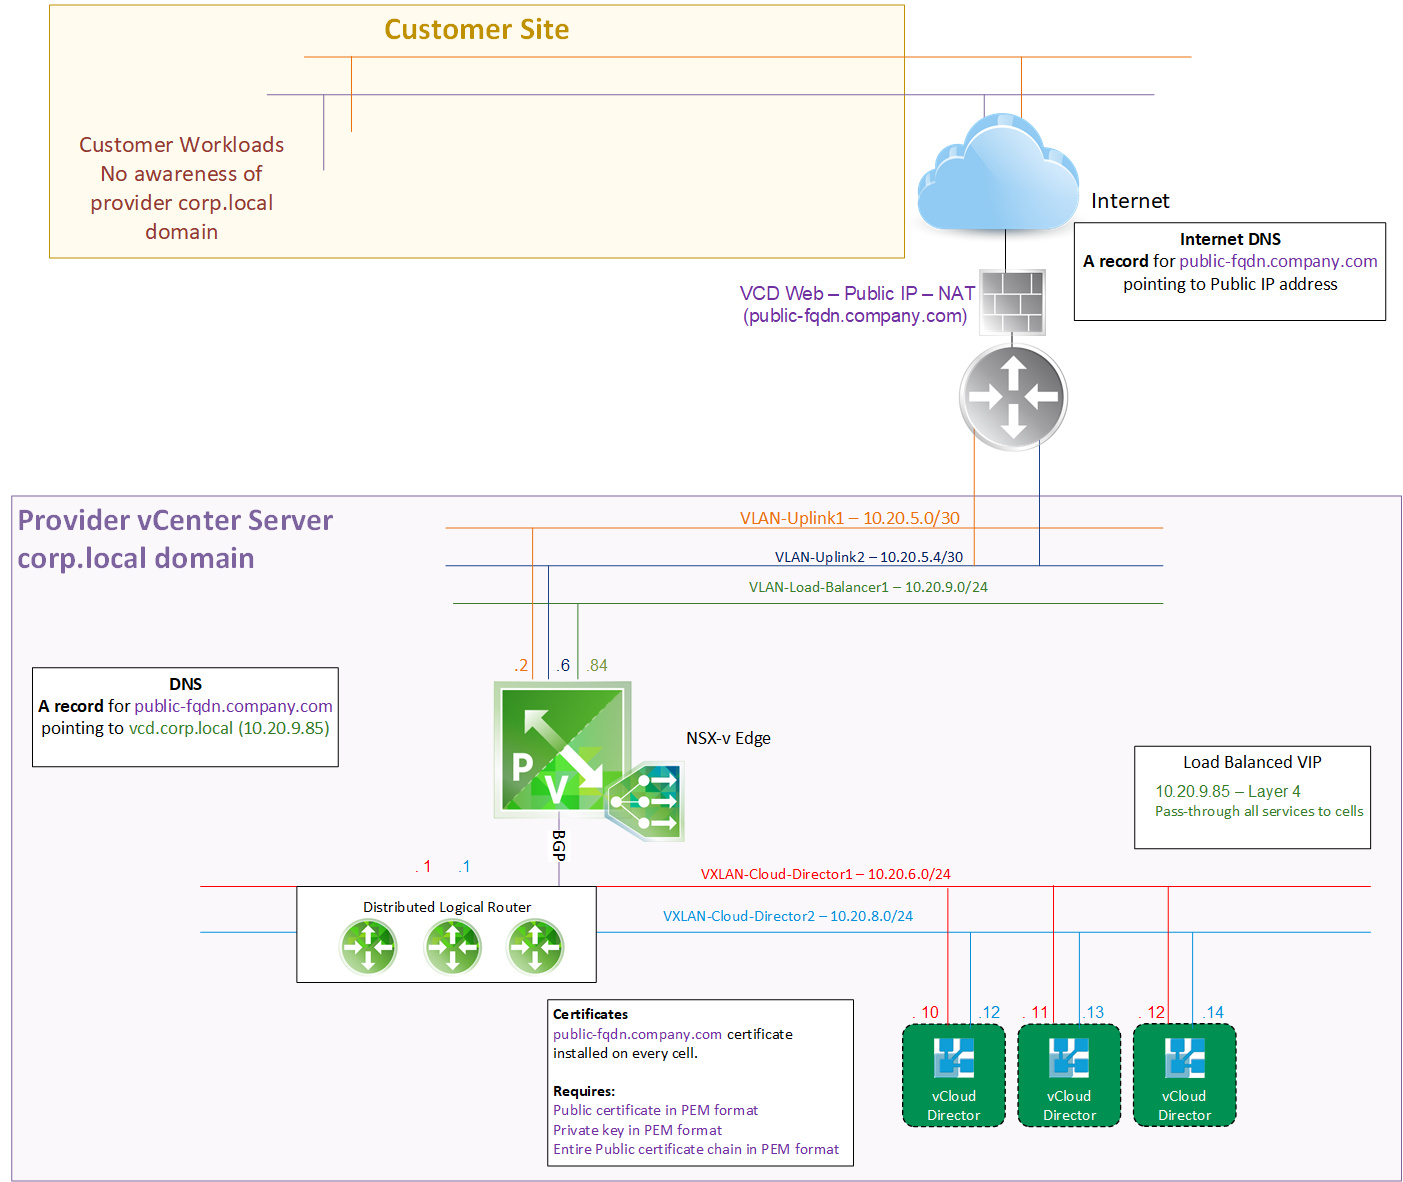
Scenario 1: Customer Traffic Flow
- The internet facing public FQDN (shown in purple) is configured on the internet DNS servers with the public address.
- That address points to the firewall where NAT is configured to pass the traffic from the public IP to the internal address of 10.20.9.85 of the load balancer (shown in green).
- The load balancer is configured with L4 load balancing to pass through all traffic destined for 10.20.9.85 to the back-end VCD cells on eth0 (shown in red).
Scenario 2: Internal Traffic Flow
- Internal users follow a similar approach but their DNS records points the public FQDN (shown in purple) to the internal load balanced IP address (10.20.9.85).
- The load-balancer then passes directly to the backend servers.
In both these scenarios the public CA-Signed certificate is installed on the backend servers, as mentioned in the box next to the servers. Each cell requires three key items.
- Public certificate in PEM format
- Private key in PEM format
- Entire Public certificate chain in PEM format
Steps
Pre-Installation Steps
- Generate a Certificate Signing Request (CSR) for the public FQDN and send it to your public Certificate Authority (Hint Lets Encrypt can be used for free!).
- Once the certificate comes back, convert the files to PEM format (if not already). Reminder you need:
- the public server certificate
- the private key
- the certificate chain consisting of the intermediate CA certificate and the root CA certificate
- Remove any encryption passphrase from the private key prior to installation as VCD doesn’t support importing the private key with a passphrase in place. Don’t worry though as part of the installation process is to add a passphrase to keep the private key secure and you can always delete the unencrypted private key once you have imported the key into the first VCD cell.
For guidance on how to do these pre-install steps, check out the various Openssl guides out there such as this one at digicert. It’s a fairly straight forward process.
VCD Installation Steps
- copy the certificate files to the
/tmpdirectory on the cell using SCP or WinSCP. - Take a backup.
- Snapshot all VCD cells.
- Quiesce the cell management tool service and stop the cells from servicing clients.
- Check if servicing clients.
/opt/vmware/vcloud-director/bin/cell-management-tool -u <USERNAME> cell --status - Quiesce the active jobs.
/opt/vmware/vcloud-director/bin/cell-management-tool -u <USERNAME> cell --quiesce true - Check the cell isn’t processing any active jobs.
/opt/vmware/vcloud-director/bin/cell-management-tool -u <USERNAME> cell --status - Shut the cell down to prevent any other jobs from becoming active on the cell.
/opt/vmware/vcloud-director/bin/cell-management-tool -u <USERNAME> cell --shutdown - Now run the status command again to check that job count says zero.
/opt/vmware/vcloud-director/bin/cell-management-tool -u <USERNAME> cell --status
- Check if servicing clients.
- Stop the Cloud Director service on all cells.
service vmware-vcd stop - Perform the following steps on the first VCD cell only
Import the PEM server certificate and the private key into a new pfx format certificate
openssl pkcs12 -export -out /tmp/public_fqdn_address.pfx -inkey /tmp/public_fqdn_address.key -in /tmp/public_fqdn_address.crt
Note: If your certificate comes with a name such as cert.pem format or cert.cer, you can just rename it to .crt. VCD requires certain formats for this step to work and a simple rename is all that is required. - Create a new certificates.ks file and import the pfx formatted certificate.
/opt/vmware/vcloud-director/jre/bin/keytool -keystore /tmp/certificates.ks -storepass 'ComplexPassPhrase' -keypass 'ComplexPassPhrase' -storetype JCEKS -importkeystore -srckeystore /tmp/public_fqdn_address.pfx -srcstorepass 'ComplexPassPhrase'
Make sure to substitute'ComplexPassPhrase'with a suitably complex passphrase and store it somewhere safe for later use!! - Change the alias for the first certificate entry to http.
/opt/vmware/vcloud-director/jre/bin/keytool -keystore /tmp/certificates.ks -storetype JCEKS -changealias -alias 1 -destalias http -storepass 'ComplexPassPhrase' - Import the certificate again (this will recreate the alias 1 for use by the consoleproxy service)
/opt/vmware/vcloud-director/jre/bin/keytool -keystore /tmp/certificates.ks -storepass 'ComplexPassPhrase' -keypass 'ComplexPassPhrase' -storetype JCEKS -importkeystore -srckeystore /tmp/public_fqdn_address.pfx -srcstorepass 'ComplexPassPhrase' - Change the alias for the first certificate entry to consoleproxy.
/opt/vmware/vcloud-director/jre/bin/keytool -keystore /tmp/certificates.ks -storetype JCEKS -changealias -alias 1 -destalias consoleproxy -storepass 'ComplexPassPhrase' - Import the combined root and intermediate certificate (which we will give the alias of root) into the certificates.ks file.
/opt/vmware/vcloud-director/jre/bin/keytool -importcert -alias root -file /tmp/public_fqdn_address_ca.crt -storetype JCEKS -keystore /tmp/certificates.ks -storepass 'ComplexPassPhrase' - Verify the entries exist in the certificate.ks keystore. There will be three, http, consoleproxy and root.
/opt/vmware/vcloud-director/jre/bin/keytool -list -keystore /tmp/certificates.ks -storetype JCEKS -storepass 'ComplexPassPhrase' - Make a backup of the current certificate
mv /opt/vmware/vcloud-director/certificates.ks /opt/vmware/vcloud-director/certificates.ks.old - Copy the new certificate to the Cloud Director directory
cp /tmp/certificates.ks /opt/vmware/vcloud-director/ - List all the entries, you should now see three, http, consoleproxy and root
/opt/vmware/vcloud-director/jre/bin/keytool-list -keystore /opt/vmware/vcloud-director/certificates.ks -storetype JCEKS -storepass 'ComplexPassPhrase' - Change the keystore owner to vcloud.
chown vcloud.vcloud /opt/vmware/vcloud-director/certificates.ks - Reconfigure the Cloud Director application to use the new certificate
/opt/vmware/vcloud-director/bin/configure - Start the Cloud Director application
service vmware-vcd start - Monitor startup logs
tail -f /opt/vmware/vcloud-director/logs/cell.log
Post Installation Steps
Copy the certificates.ks file to the other cells and repeat steps 16-19 to finalize certificate installation.
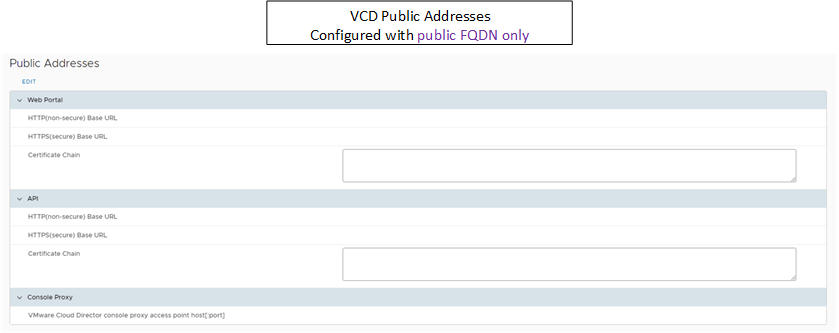
Once complete VCD will now be using the new certificate, the only remaining step is to update the public URL within VCD provider portal to listen for connections on the public FQDN as shown in the diagram below.
Tagged with: VCD
Keep the conversation going on Twitter!
Reply with Twitter